Fall Fishing

Entomology Discussion 


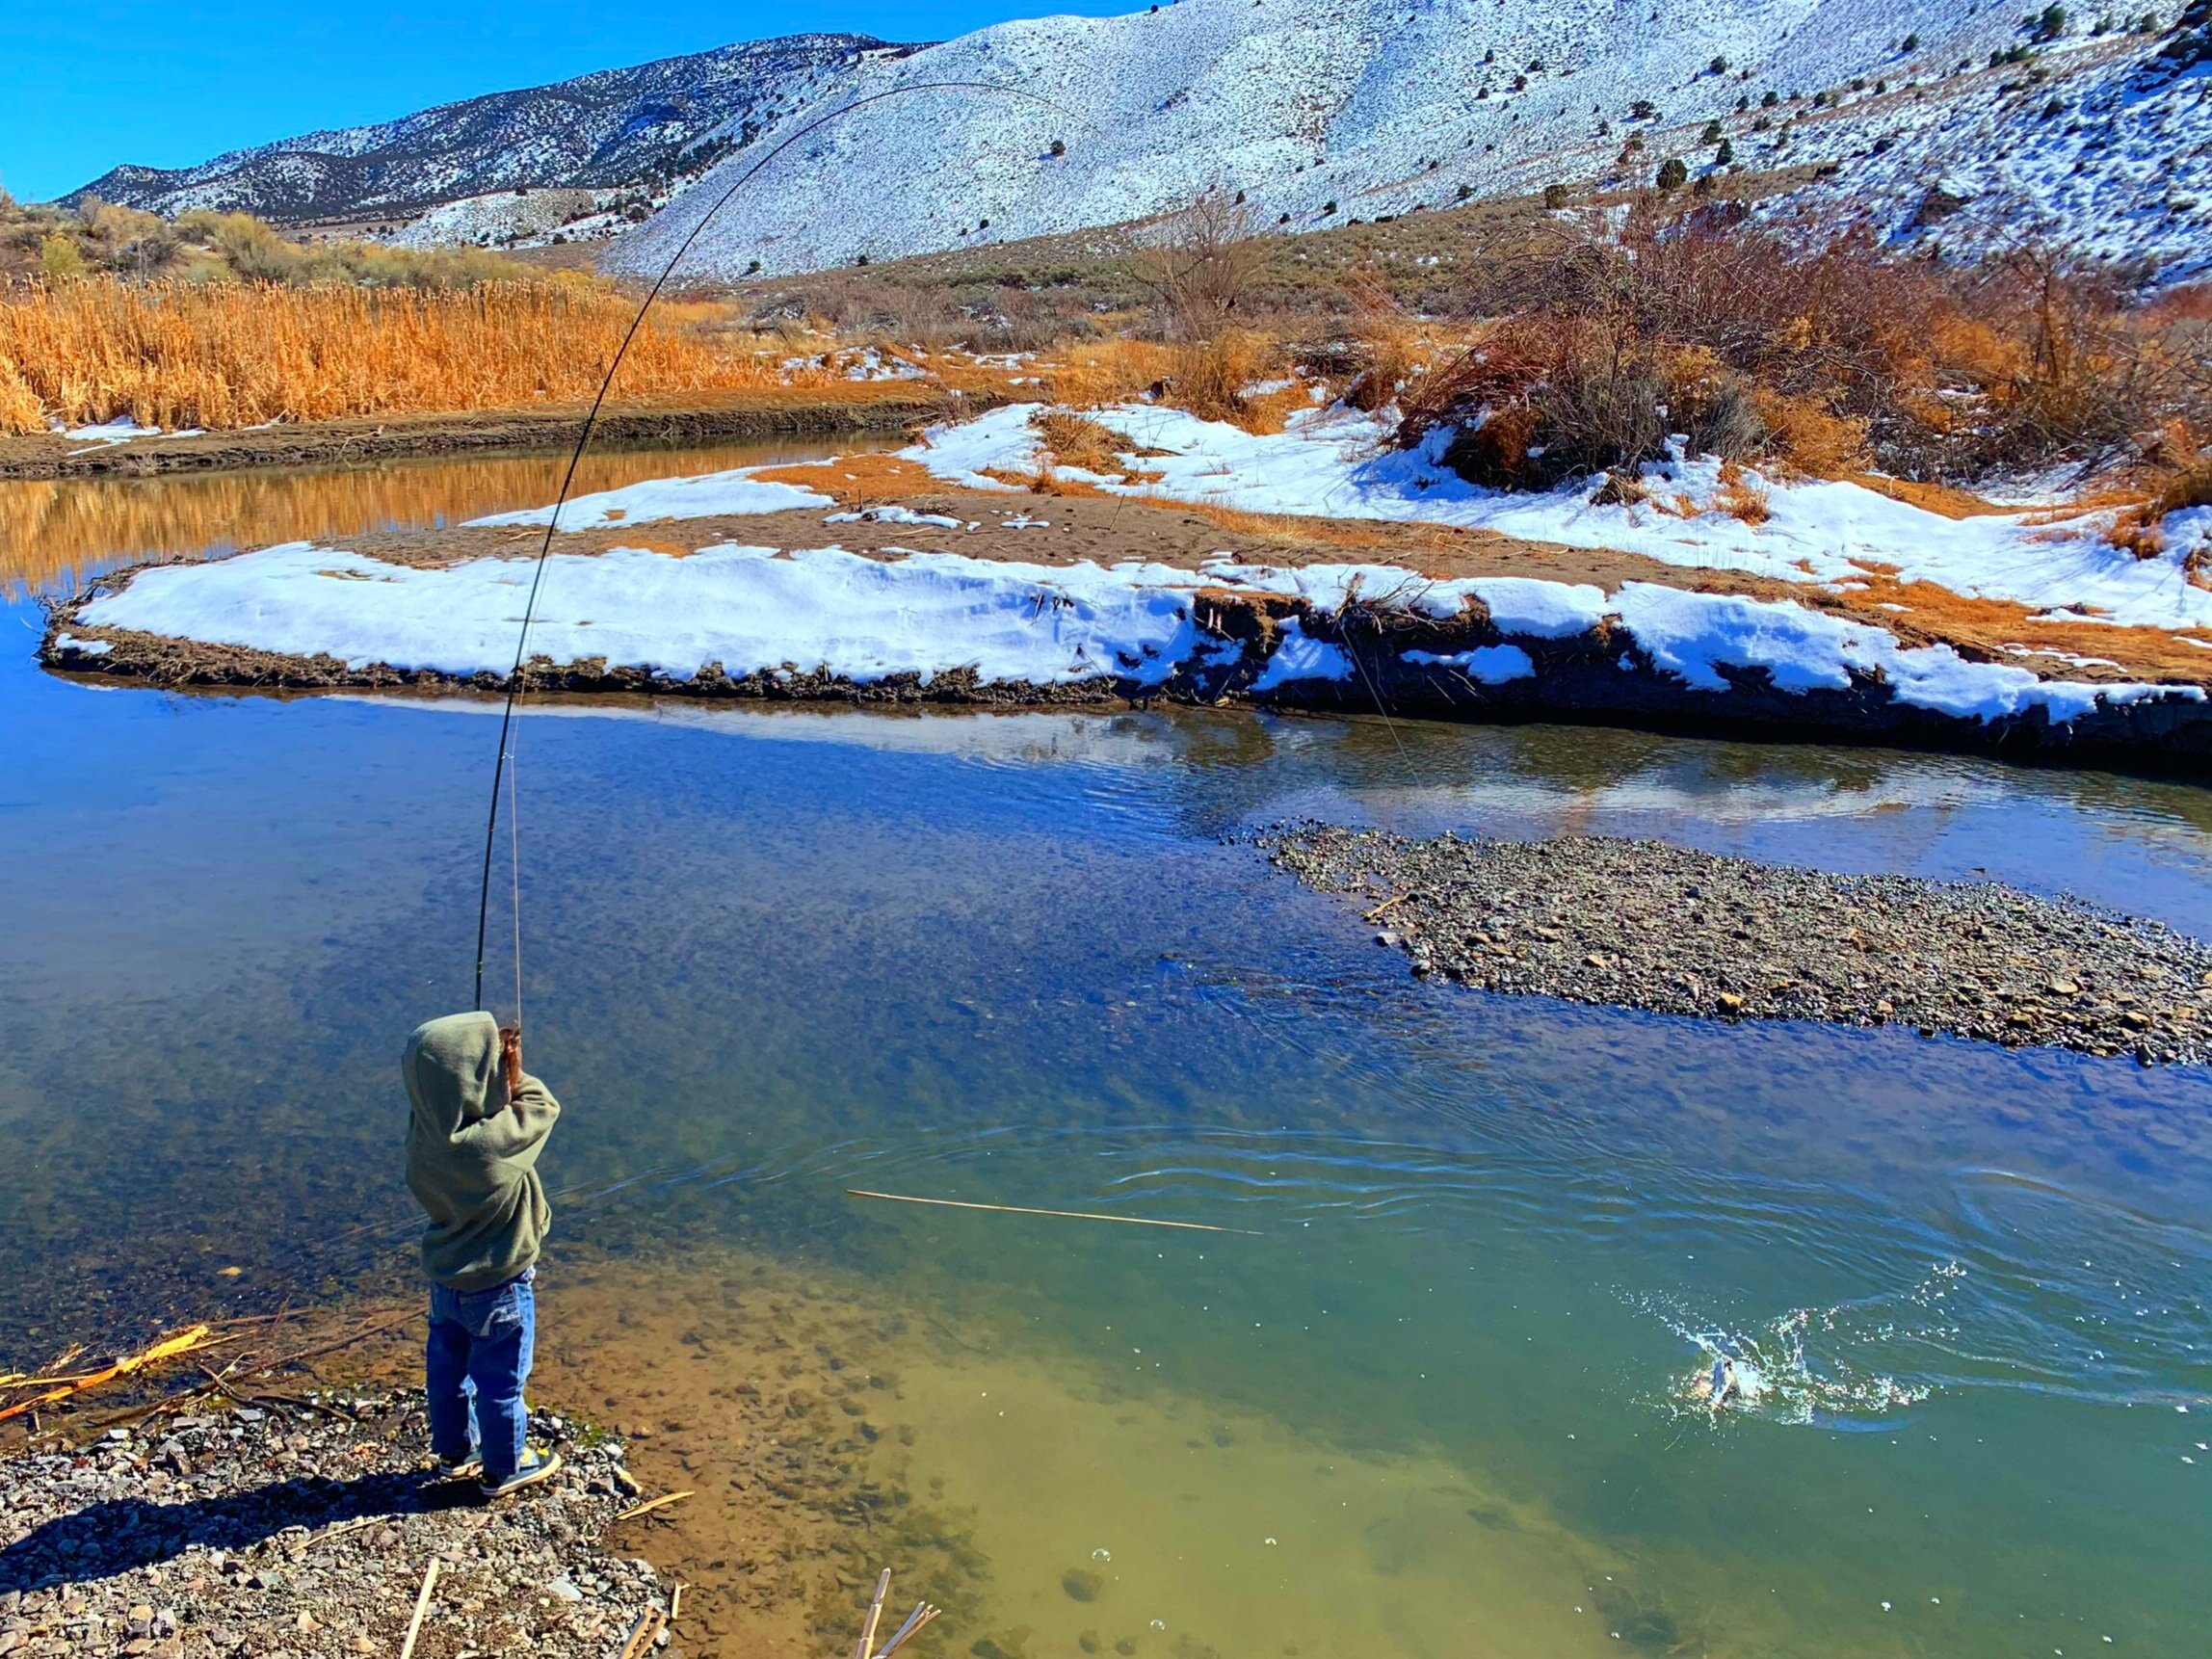
Alright lads and lasses. With the end of the summer season approaching us here in the Northern Hemisphere, I hope you all have had a phenomenal fishing season thus far. The nighttime temps are starting to drop into the upper 30s, and the fish are staying in their jammies until mid-morning. That said, my local rivers and lakes are beginning to see their seasonal changes. The Lakes are beginning to turn over, fall colors are about us, and the Fall fishing is HOT!


As the water temps drop, so too does the bug activity. Long over are the days of the incredible Stoneflies, Not to mention the sometimes literal clouds of Tricos. If there is one last hurrah, one hatch that could be considered a Trout’s final big meal of the season, It would be the October Caddis, Latin Dicosmoecus. 


October Caddis’ are a member of the Limnephilidae Family. Members of that family tend to be large casemaker caddisflies. As such, they will make their larval/pupal homes out of surrounding small gravel and/or grass reeds or very small twigs. October Caddis are predominantly found in rocky-bottomed, fast-moving, freestone streams. They are bright yellow to orangeish in color and can be as large as 25mm long as adults! You’ll find them hatching in the afternoon/early evening hours. 

Caddis taken from the Beaver River


If you find yourself lucky enough to be on the water when these behemoth Caddis are hatching, I hope you have on hand flies to meet the challenge. An Elk hair in a size 8 tied with a bright orange body is a good baseline. One of my Go-TO patterns is the Neversink Caddis, tied in size 8 or 10. Make sure to have an orange body and dark wing.  When fishing, a good technique is to skate the caddis downstream. You can do this by casting down and across the river/stream and keeping your rod tip high. At this point, wiggle the rod tip in a slight side-to-side motion being sure not to lift the fly off of the water. When done correctly, the fly will skate across the water in a waking fashion. This gives the impression of a caddis running on the water's surface and can cause some wickedly aggressive takes. That said, there is absolutely nothing wrong with a good upstream cast and dead drift through a pool, riffle, or seam. 


So…as the season is coming to a close, Get out there! There are still great opportunities to get into some epic days on the water and wet a line. The fish are trying to put on whatever feedbag they can before the harsh cold of winter sets in. 


Take advantage and tight lines.


Cody Prentice

Lost River Angler

It's Time to Get Ready for Some Spring Fishing.

Amidst the February drudge of winter, there are subtle signs that spring is fast approaching. When ice off happens the last thing you want is to be caught unprepared for the spring fish feeding frenzy.

Follow these five tips to make sure your gear is in great shape and ready for when the hard water melts.

Southern Utah Lake for Fly Fishing Winter Time

1. Check your rods for marks and scuffs.

Wear and tare on a fly rod is normal and usually not something to be too concerned over, but if while giving the rod a delicate flex you hear any pops, you may want to start saving up for the next replacement.

2. Make sure your line is cleaned or replaced.

For optimal performance a fly line needs to be cleaned a minimum of two to three times a year for the average fisher, but keep in mind, the more your fish the more you should clean your line. Lost River Angler fly shop carries Loon Line Speed Cleaner for $9.00 and a leader straighterner/cleaner for $4.99. In a pinch, you can get away with cleaning your line with mild dish soap and warm water.

Check your line by looking for any cracks in the line. Make sure to check the loop at the tip of the line for any wear and tear. Other signs that your line needs to be replaced are the line sinking in the water instead of floating and a reduction in line shooting smoothness when casting. A reasonably maintained fly line should last around 250 days on the river. How long this is depends on how often you fish. If your are not sure if your line needs to be replaced bring it into the shop to have it checked.

3. Test waders for leaks.

A potentially great first day of spring fishing can turn to cold, wet, misery in a hurry when you step into the water only to remember that hole in your waders you forgot to patch last fall.

We suggest testing your waders for leaks before hitting the water every spring. A great way to do this is to sit in a bath with your waders on. Any leaks will then show up on your pants allowing you to easily find the leak or leaks on the waders and get them patched before a day on the water.

Lost River Angler carries AquaSeal repair kits for $7.50, or if you would prefer, save time and have Lost River Angler repair your waders for you.

4. Boots are often overlooked.

Make sure your wading boots are in good condition and ready to go. Do this early so there will be plenty of time to replace them if needed. If the boots are in good condition but the laceses need replacing 5-50 cord will do the trick allowing for good laces without breaking the bank.

5. Get those fly boxes in order.

Winter is a great time to stock up on the flies you will need for the spring. Spend a night going through your boxes to clean out anything thrashed from last seasons use. Make a note of those thrashed flies or anything else you are missing so you will be able to replace them. Organize and put like flies together for a quick fly change on the river. Once you know what you are missing either get to tying or stop into the shop to stock up.

Fly Fishing In The Winter

During the fall fishing frenzy, I had a man stop into the shop. In the course of our conversation, he mentioned that he needed to get in all the fishing he could before the trout go into hibernation. It is a common misconception that fish hibernate in the winter, and while they do not technically hibernate they do enter into a state called torpor. Torpor can last from a couple of hours to a few weeks and puts the fish into a lighter sleep state that full out hibernation. Fish can enter torpor instinctively or by choice and have some control over when they enter this state and come out of it. Lucky for us, trout prefer colder water and only enter torpor during the coldest parts of the winter, leaving us plenty of chances to catch trout during the winter months.

4B6DE389-D567-4A2D-BE40-C1B9F459E30D_1_201_a.jpg

Follow these four tips for winter fly fishing.

1. Keep your expectations in check. During the winter months, a good day on the water means catching one fish, but for us die-hards any day on the water is better than a day doing chores at home. If you happen to catch more than one fish you can brag about it to your other fishing friends.

2. Sleep in. The colder the water the more chance the fish are in torpor. Wait until mid-afternoon on sunny days to hit the water. This being said, don't discredit windless, snowy, grey days fish tend to be more active at this time as well.

3. Slow and deep. Trout tend to hand out in deeper water where the temperature is a little warmer. Make sure you are using a weighted fly and strike indicator to get the fly down to where the fish are hanging out. Trout won't exert energy to chase after their food in the winter and just like the fish, the food slows down in their movements as well. With this in mind, make sure your dead drift game is on par.

4. Go micro or massive. For a fish to really be tempted to eat something it has to be small and drifted right in front of his face or a big hunk of steak stripped through Mr, Brown Trout's living room. Only small insects, mostly nymphs, or fingerling fry are available. When fishing carry general patterns such as Copper John, Pheasant Tail, Scuds, or San Juan Worms in sizes 16-22. There are occasionally hatches of small midges or BWO mayflies. If you happen across a hatch try using a midge emerger or mayfly emerger in sizes 20 or 22. If your wanting to go the streamer route try a Slumpbuster, Baby Ganga, or Barley Legal ranging in sizes 2-10.

- Tight (frozen) lines

P.S. Don't forget the Stanley's Ice Off Paste.

Stocking Stuffers For The Fly Fisher or Fly Tyer

It’s that time of year again, Christmas music on the radio, Santa popping up everywhere, and Christmas shopping. One of the most fun parts of Christmas shopping is buying stocking stuffers. It’s so fun to be able to buy a lot of little gifts that you just know the recipient will love. For the fly fisher or tier in your life look no further than your local fly shop to fill that stocking. With plenty of small cost-effective gifts, you are sure to find exactly what you are looking for to please that special fish lover in your life. If you have something bigger than a stocking stuffer on your mind for a Christmas gift, we can help with that as well.

Here are 10 stocking stuffer suggestions for the fly fisher or tier in your life.

159F7FF5-887D-4401-B62B-20FCE0BBCBDA_1_201_a.jpeg

1. Stanley’s Ice Off Paste

Stanley’s Ice Off Paste by Loon Outdoors is an antifreeze paste for fishing lines and rod guides that helps to prevent them from freezing while fishing in the cold. This is perfect for the die-hard, four-season, fisherman.

Cost: $7.99

82BF88E7-153C-4123-B188-EE5CD4BC17C1_1_201_a.jpeg

2. Dubbing

Dubbing is essential in fly tying. With the huge selection of dubbing at Lost River Angler, you are sure to find what you want. Bonus if you purchase Christmas colors.

Cost: $2.99-$3.25

B8658720-72F2-41E4-AAF7-47617E710524_1_201_a.jpeg

3. Field Wader Repair Kit

Nothing worse than stepping into the water and finding a hole in your waders. With this field repair kit, you can fix small holes right on the bank, no need to suffer through leaky waders.

Cost: $7.50

859791E6-5535-460E-910D-569D044B4592_1_201_a.jpeg

4. Thread and Wire

Technically this is two separate materials, but who is counting? You can’t tie flies without thread and wire adds sheen, durability, and weight to a fly.

Cost: $2.99-$3.90

F9A95F2D-ED12-421E-86F8-C6FEE53DA813_1_201_a.jpeg

5. Strike Indicators

Lost River Angler has several styles of strike indicators to choose from so you can be sure to get your fly fisher exactly the style they like.

Cost: $.75-$15.95

4CFD6D30-5C1E-40F4-AE1D-1F9D4B514050_1_201_a.jpeg

6. Zingers

If you are tired of your fisher coming home complaining of lost tools, get them a zinger. A zinger attaches tools to a fly fisher's vest keeping them in easy reach and safe from those unwanted river mishaps.

Cost: $7.99-$8.99

2C13B10F-DFF5-449D-BF90-B2F57DB22FF2_1_201_a.jpeg

7. Face Mask/Buff

Help your loved one show off their fondness for fishing. Our multifunctional buffs come in fish patterns. Besides use as a face mask, these buffs are UV skin protectant and work great for keeping a person warmer in the winter and cooler in the summer while on the water.

Cost:$ 9.99


DE74C10E-A344-425B-94C4-DD5CFC0132AF_1_201_a.jpeg

8. Fishing and Tying Tools

This is another two for one. Lost River Angler sells tying tools both individually and as a kit so you can get just one needed tool or a whole set. We also have many tools to make your time on the river simpler.

Cost: $4.95-$24.99


98069458-9A03-4977-A3BB-3D62EFA47467_1_201_a.jpeg

9. Fly Boxes

For those who say you have too many fly boxes, stop talking to them. You don't need that type of negativity in your life. There has never been such a thing as too many fly boxes.

Cost: $8.00-$20.00

04971D14-73C4-465A-9EDC-48B32824C1F3_1_201_a.jpeg

10. Flies

Everyone needs flies to fly fish. With our wide selection to choose from you can get the fly fisher in your life some old favorites and even throw in some new flies to try. If you don’t see what you're looking for we do custom fly orders.

Cost: $.99-$6.50

Tips For The Beginning Fly Tyer- Understanding The Basic Threads

As I have mentioned in a previous post, my fly fishing carrier was spawned from seeing an individual on a river fly fishing while I was spin casting. As a young boy with the ambition to learn to fly fish comes the need for flies. I never had an allowance as a kid, so I needed to figure out how to tie my own flies since I couldn't go to my local fly shop, which at that time was an Ace Hardware. 

The first challenge was trying to acquire materials. As my dad was not a hunter, I couldn't scrounge any big game hides or upland/waterfowl feather material from his collection, so I began to gather random feathers and embarrassingly enough, fresh road-killed squirrel tails. 

As a 10-year-old summoning my inner Jeremiah Johnson there was one occasion where I went to my local community pond with my pump actuated air rifle and shot one of the town’s pet geese to take home (to my mom’s horror) for both purposes of eating and gathering tying materials. I will tell you now that goose tasted awful!

In those days I was using whatever thread I could get my hands on to tie flies with. I ravaged my mom’s collection of sewing thread to secretly add to my ever-growing fly tying materials collection. 

I was soon to discover, however, that cotton sewing thread is a natural material, and if left wet in a fly box, it soon begins to rot. I then came to the realization that thread designed for fly tying, while similar in shape and color, couldn't be more different than night and day from sewing thread.

Let's get down to the basics of fly tying thread. 

There are several major manufacturers of fly tying thread. Some of the big names we will be discussing today are UTC, Uni-Thread, and ViVus. For the sake of this blog post, these will be the three threads that we cover. 

You will find the term denier and “ought” i.e. 6/0 8/0 etc. used in the description of the threads we will cover. Not all threads are alike as some threads are corded and others are flat. This needs to be taken into consideration when the fly that your tying may be a size 24 trico or a #2 articulated streamer. 

Watch the video link below for a detailed description of a few of the different threads used in fly tying. 

Series: Tips For The Beginning Fly Tyer

As I was working on a fly pattern for this blog, I came to realize that although there are plenty of you out there that know and understand all of the instructions for my past fly recipes, there are also a lot of beginner fly tyers who don’t understand how to even tie in the thread to begin any fly.

With this in mind, I am going to begin a series specifically for the beginning fly tyer.

In this series, I plan on going through all of the basics of fly tying. I will be teaching the terminology and showing the technique as well as going over some of the basic materials used in fly tying. 

Some of the first flys I tied when I was a kid.

Some of the first flys I tied when I was a kid.

Being a mostly self-taught fly tyer myself, I am excited to share my love of fly tying with a new group of people. If you have any ideas of beginner techniques that you would like me to write about feel free to leave a comment, send me an email, text, call, or just stop into the shop for a chat.

For my Dad

Today’s blog post will be slightly different, and to be honest a bit difficult. If it were a normal week, I’d be giving either a tutorial, a fly recipe, or talking bugs. It hasn’t been just a “normal week” for me. My Father passed away a week ago and I’ve got to tell you, I’m struggling. It wasn’t a situation where he had been ill for an extended period, giving the family time to somewhat prepare for the eventuality of death. It was sudden and COMPLETELY unexpected.

My Dad was my first fishing partner as I’m sure it is much the same with a lot of you. My fishing life started throwing ultralight spinning rods for trout. Mepps, Roostertails, and Panther Martin’s where what adorned my boxes then. Dad always liked the idea of catching big trout on light tackle and as such, so did I. We were visiting some close family friends in southern Idaho one summer. While out fishing on the Portneuf River I witnessed for the first time someone throwing a fly rod. I remember asking, “Dad, why’s he castin’ so funny, dosen’t he know that’s not how you cast?” To which he replied with a chuckle, “That’s fly fishing Code, that’s how he’s supposed to cast.” I was enamored! “You mean he catches flies and puts them on a hook,” I said. That, of course, got my dad laughing. “No, he makes flies with feathers and hair from different animals.” Needles to say, and no pun intended I was hooked, I had to learn more. As I said earlier, Dad threw ultralight rods, but he fielded my countless questions and sparked a new obsession. That year for Christmas he got me an inexpensive Cortland fly rod/reel kit that came pre-spooled and ready to go out of the box. It even had a handful of flies and a plastic card with knot tying instructions. I couldn’t have been more pleased if I’d received a bucket of gold. I took it out as soon as the weather warmed and started casting in my back yard. I can recall casting to a puddle, using it as target practice. I still have that clunky brick-like tapered rod to this day.

In 2017 I was able to selfishly peal my dad away for a four day weekend. We went back to Idaho but this time to fish the South Fork of the Snake. We hired a guide out of Henry’s Fork Anglers and spent the day floating the river. We caught a good number of fish and had a blast. The following day we then drove through the west entrance of Yellowstone, after that we just sorta fished our way home. It will forever be my favorite fishing experience with my Dad.

My Dad, Brother, and I were supposed to go fishing together this last Monday, (the day after Father’s Day) on one of the local lakes here in southern Utah. Needless to say, that didn’t happen. My brother and I are still planning on going we just need to set a date, and I know Dad will be with us. I just wish we could have gotten one more fishing trip in with him.

I love you Dad

Strike Indicator Review

While on the river the other day, I was enjoying a quiet morning, listing to the water and waiting for the hatch to start. When off in the distance I began to hear what sounded like something out of an old western movie. I swore I was hearing spurs jingling. Suddenly through the thicket emerged what looked like an Orvis endorsed mannequin. Now, I don’t mean any disrespect to Orvis, but this guy was draped head to toe, arm to arm in Orvis. The latest shirt, hat, waders, boots, rod, reel, sling pack, you get the picture! Hanging from any available D-ring or loop was every tool imaginable. There I was, wet wading with a simple chest rig, a few tools, and a box of flies. To him, I’m sure that I must have looked like a homeless, “lost in the woods and haven’t seen a white man” type of wandering fisherman. We chatted for a bit and talked about our different strategies and preferred methods of taking fish. After a while, we parted ways and wished each other luck and tight lines.

Since then I haven’t been able to stop looking at my own kit, to see how many tools I think I need. Which begs the question, do we as fishermen really need all the bits and bobs that adorn our vests? How much of the “stuff” that we carry do we REALLY use? The world of fly fishing is an ever-evolving sport in which new ideas, new technologies, and an overwhelming amount of tools, are supposed to make our day on the water more enjoyable. Do they?

One tool that I think is so over thought is the simple strike indicator. It can be found in as many different forms as you can imagine, in as many different materials as well. From plastic to cork, foam to yarn, friction fit to adhesive-backed, need I say more? I understand that different situations call for different tactics, but strike indicators need to cover just a few simple functions. First and foremost, an indicator needs to telegraph to the angler when a fish has taken his/her fly. Second, it needs to be buoyant enough to stay afloat when using larger nymphs in deeper/faster water. Third, the indicator should land somewhat delicately so as not to spook every fish within 100 yards. Fourth, it shouldn’t be so large and unwieldy to cast, that all you do is spend your time untangling wind knots.

Let me start off by saying I’m not in any way endorsed by this company I’m about to mention. I have however spoken to them on many occasions at different trade shows telling them just how I feel about their product. It covers all of the criteria that I have already mentioned. It is incredibly sensitive when it comes to detecting a strike. It floats high all day long even when drudging the depths with large nymphs. It lands as delicately as a breath of wind. And, it is effortless to cast, even for the beginning caster. Not to mention it stays put even when casting aggressively and doesn’t kink your leader at all. The indicator I speak of is the New Zeland Strike Indicator Company.

F9AA019F-9EAF-4516-8E2F-A3767EB47DB1_1_201_a.jpeg

Ok, ok, I get it, you have your favorite indicator. It suits your fishing style or the conditions you fish the most. I’m not saying that you’re wrong for fishing “insert brand” indicator. All I’m saying is that the New Zeland indicator fits the criteria that I feel needs to be met.

When you first look at the packaging you will ask yourself, what makes this so different from other yarn style indicators? First off, it’s not yarn its wool. Wool is covered with lanolin, which is a natural oil that is essentially a waterproofing barrier. So, it will float effectively on its own, the old “oil and water don’t mix” analogy. That being said, if you feel like applying your favorite floatant, it will ride even higher for longer! What I feel truly separates this from any other product, is the way that it is attached to the leader. The New Zeland Indicator utilizes surgical tubing. There are two different sizes of tubing depending on conditions. The smaller tubing is a general-purpose tubing designed for the average-sized nymphs. The larger tubing is designed for large Stone or Salmonfly nymphs and lends itself perfectly to still water when fishing large nymphs or balanced leeches.

It doesn’t matter whether you are fishing still water, a spring creek, or your favorite bit of tight pocket water, the New Zeland Strike Indicator can match the conditions at hand. It also works amazingly well when fishing those tiny dries. When the Trico’s are buzzing and you can’t pick your fly out on the water put a small green or white tuft of wool 8”-10” above your fly. When a fish rises in the general vicinity of the indicator “SET”. Trust me, it works great! On the really overcast days, try the black wool, you will be surprised at how well the contrast is of the black wool on the dark water!

I hope this has given you something to consider the next time you are in the market for a strike indicator. If you’re interested in the New Zealand Strike indicator, give us a call or stop on by and try it out for yourself. No matter the indicator you use, I hope to see you on the water.

Tight Lines -